A computer with Google Chrome installed (Google Chrome is a web browser)
TV Running Android TV or any TV + Chromecast that is set-up
All devices connected to Wi-Fi
Let’s get started:
Turn on your TV
If you’re using a Chromecast, switch to the HDMI input it’s connected to
Head back to your computer and Open Google Chrome
Click the 3 little circles in the top right hand corner to open the menu
Select Cast, in the menu
A list of places you can cast to will appear, but first we need to go to the bottom of the menu, and select Sources.
I always choose Cast Desktop, so the TV will see whatever I have up on my screen
(Hot tip: Check what else is open on your screen. Close any windows you don’t want to appear. Unless you want everyone to see your email.)
Next, head back to Chrome and Choose where you want to Cast to, from the list.
I’m going to pick my Chrome Cast. If you’re casting straight to an Android TV, it will show up here.
A window will pop up confirming you want to share your desktop.
Select SHARE.
Now you should see your desktop on your TV
Here’s what you need for a WIRED OPTION:
Computer running Windows 10
TV
HDMI Cable
Adaptor (maybe)
(Hot tip: Check what kind of video output you have on the sides of your laptop. If your laptop does not have an HDMI port, but instead has a VGA or Display Port, you may need to get an adaptor.)
Let’s get started:
Plug the HDMI Cable into your laptop
Run the cable to your TV
(Hot tip: If you can, we suggest getting a High Speed or Ultra High Speed HDMI cable.)
Plug the cable into an HDMI port on your TV
Use the remote to check that you are on the right HDMI input
Now let’s choose how you want to project from your laptop
Press the Windows and P keys to bring up your options
Here’s what the settings mean:
Duplicate: Everything from your laptop screen will show up on the TV
Extend: Makes the TV a different monitor, so you can have different things on the laptop and the TV
Second Screen Only: Uses the TV as the monitor, so your laptop screen turns off.
Pick what works for you. We recommend selecting Duplicate Screen.
2 – HOW TO CONNECT YOUR SMART PHONE OR TABLET TO YOUR TV
The easiest way is to use an adapter cable.
You just need to know what kind of video input (or PLUG) you need to go into your TV. And what kind of input (plug) you need on the other end of the cable to go into your cellphone or tablet.
Most TV’s have two types of video inputs (plugs) on the side or back of the television:
HDMI is the most common. Some older TVs have the red, yellow, white connectors (composite or RCA style plugs).
The end of the cable that goes into your cellphone will either be an iPhone “lightning” style plug, or an Android style plug.
Once you know what kind of inputs (plugs) you need on the two ends of the cable, visit your favorite online store or a brick and mortar store and purchase the cable.
3 – HOW TO CONNECT YOUR LAPTOP TO A PROJECTOR
Make sure your computer and laptop are both turned off.
Connect the video cable (usually VGA) from your laptop’s external video port to the projector.
Plug your projector into an electrical outlet and press the “power”button to turn it ON.
Turn on your laptop.
To turn on the audio, connect the laptop’s “audio out”port to the projector, or to another sound system.
Sync the projector and laptop by holding down the FUNCTION (Fn) key and pressing one of the following keys to toggle: F4, F5, F7, F8
(Note: Depending on your computer, you may have to use a different F key than those listed above.)
Your laptop and projector are now connected.
Don’t forget to project onto a screen or blank wall.
MORE USEFUL INFO:
WHERE TO PURCHASE AN HDMI CABLE OR ADAPTOR
Cables and adaptors can be purchased online, or at most office supply stores. They run about $16. A 6-foot cable is recommended.
COMMON LAPTOP VIDEO CONNECTORS
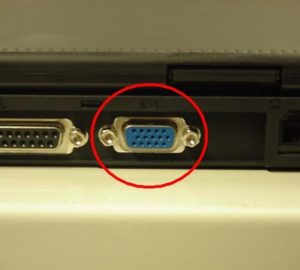
VGA:
is an old but popular video output that is still present on many PC laptops. Often it is blue or grey in color.
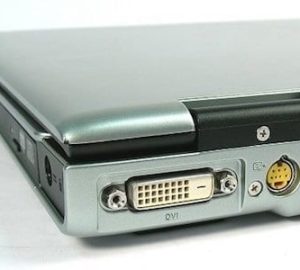
DVI:
is found on some older PC laptops and continues to be used on many desktops. Often white or cream in color.
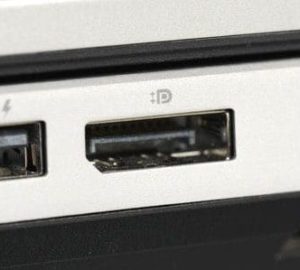
Display Port:
is found on many PC laptops. Usually you will need a Display Port to HDMI adapter for TVs.
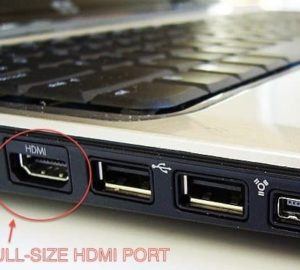
HDMI:
is found on most newer PC laptops and some older Macbooks. HDMI transmits both video & audio.
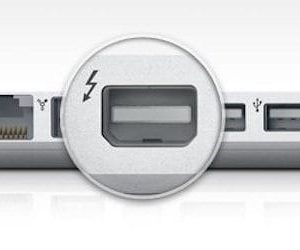
Thunder Bolt:
is present on all newer Macbooks and iMacs. You may need an adaptor to connect to a TV or projector.
USB-C:
A data, video & power connection on new Macbook & PC laptops. You may need an adaptor to connect to a TV or projector.